After looking at the steps to build a simple polariscope in Straining the point and Strain in the neck, this time we’ll run through the use of the device to visualise and recognise strain in typical neon bends, as well as some basic annealing techniques that can help to reduce strain and lessen the chances of breakage.
Scientific and industrial polariscopes can be used to make numerous accurate measurements of strain and its properties in a wide range of transparent materials. In this post we will concentrate on using the kind of simple polariscope shown in the last two posts to make fairly simple determinations of the level of strain in glass. For typical neon work this is more than adequate (although scientific and industrial glassworkers may want something more refined).

Having built the first polariscope I wanted to try to get more experience interpreting the strain shown by the instrument, as well as with techniques for minimising the strain when working glass. Highly strained materials will show a very clear and dramatic rainbow pattern of fringes from the polarisation changes taking place in materials (an example is shown in the plastic case in the image at the top of the article). Worked glass typically does not have this extreme level of stress, and the patterns seen with the polariscope are more subtle and harder to interpret, although the same general principals apply. One example of glass that does show such a level of strain is the Prince Rupert’s Drop shown in the last post.

Material that is completely free of stress should show no obvious fringes, and has a similar appearance when viewed through the polariscope as it would under normal light. Generally, more visible fringes and more tightly packed fringes correspond to greater levels of stress (in a scientific polariscope it is possible to measure these fringes and infer the precise level of strain present as well as its direction – that kind of analysis is beyond the scope of this article, but any good physics optics textbook will include an explanation of these effects).
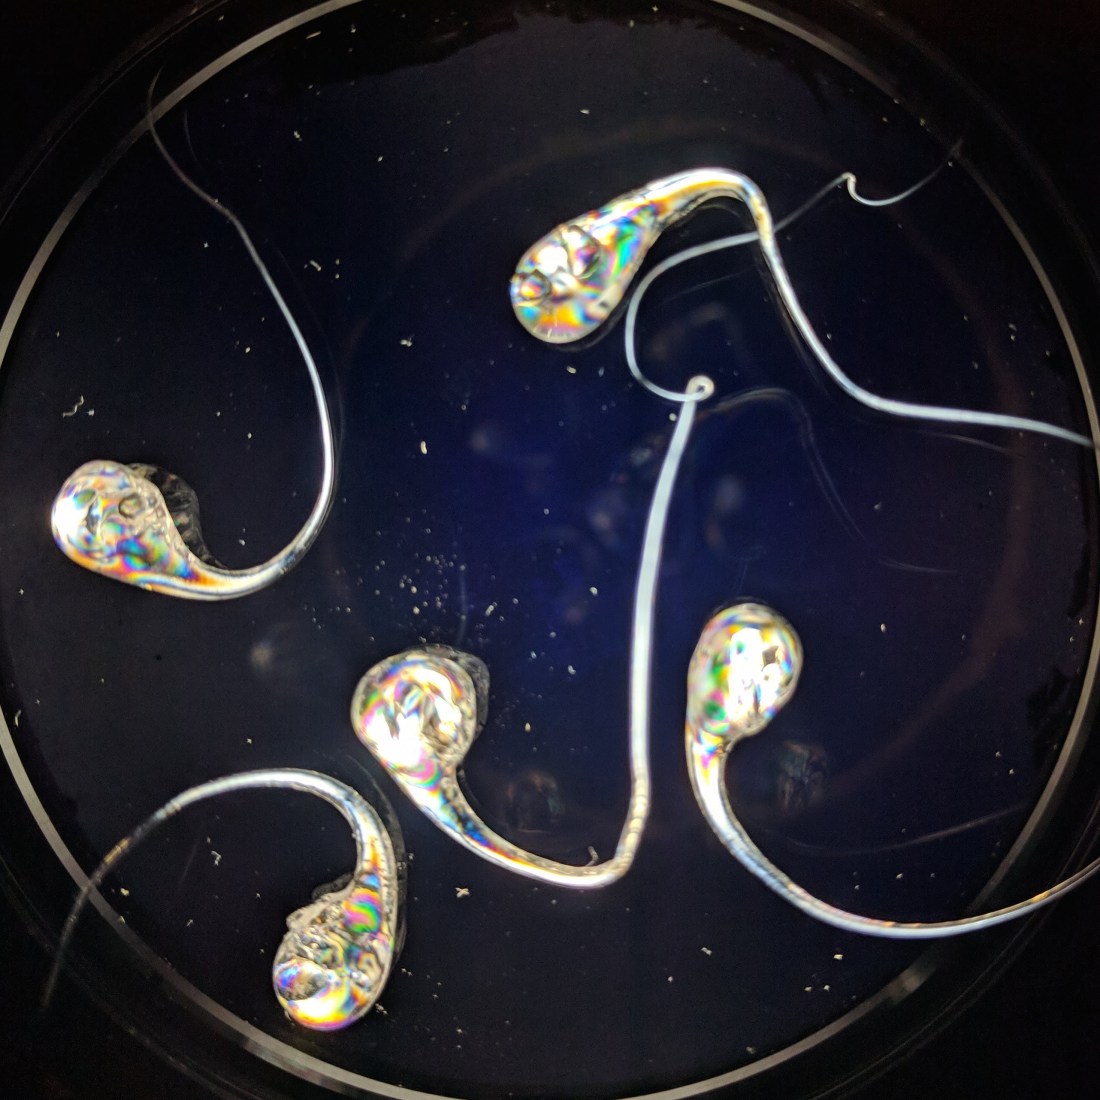
The above image shows much more extreme levels of strain in glass (that you are unlikely to see in a typical neon bend). This shows the classical rainbow fringing, and extremely densely packed fringes – the drops are just 3-5mm across!
To Flame a Neil
What has Neil ever done to me? Well. The main technique to eliminate or reduce strain in glass that has been worked at temperature is annealing. This is analogous to annealing techniques used in metalworking and other areas (including quantum computing now, apparently).
Annealing involves raising the temperature of a material close to its annealing point: the point at which its viscosity is sufficient to allow the motion of material through microscopic flows, but without allowing distortion of the overall structure. Once the annealing point is reached the material is slowly cooled to allow remaining stresses to be resolved through this motion. Technically for glass this happens when the absolute viscosity reaches 
Glass is most commonly annealed during the cooling process immediately after working – allowing the glass to cool to room temperature and then re-heating it would increase the risk of breakage from unresolved strain. Most techniques involve supplying additional heat, either from a burner or an oven, in order to slow and control the normal cooling process. Specialist annealing ovens are used in scientific glass work as well as some neon and plasma art work.
To try to get some experience using the polariscope to assess strain, I prepared a series of identical doubleback bends in 10mm soda glass. Efforts were made to make all the bends as consistent and uniform as possible, to remove variation in the samples being tested, and several bends for each group were made: again to try to limit the effects of individual variations.


These samples were labelled and subjected to different treatment after the bend had been made:
No annealing (N)
The control samples were bent and then immediately placed on a rack to cool with no further heating or controlled cooling. These should exhibit the greatest level of strain.

With no annealing the signs of strain are clearly visible: fringes begin just before the curved portion of the bend and extend through the apex, showing “pinching” (greater strain) at the edges of the apex, as well as at the transition between bent and unbent glass (which has been subject to less heating during the operation).
Quick anneal (Q)
A second set of bends were made and this time moved through the tip of the bushy flame for a few moments after bending. The idea is that the additional heat after the bend keeps the glass at or near the annealing point longer, and allows the glass to settle with a lower overall strain.
In my tests the quick annealing did not produce a great reduction in the visible strain present in the samples. It’s possible that this is down to my technique so further experiments are needed to find a quicker (and less messy) method than the full flame annealing.
Flame anneal (F)
Lastly, a set of bends made as before were subjected to a lengthier flame annealing technique that is documented in a number of older scientific glassworking textbooks. This involves holding the piece in the tip of a bushy flame for several minutes, while decreasing the amount of air in the burner mix.
A common technique (and one that is easy for beginners to learn from a book) involves keeping the glass in a yellow (or reducing) flame until it is completely covered in a layer of soot. When the glass is hot initially, the soot will not stick, so this provides a simple and visual indication that the process is complete. Better techniques are certainly possible that do not require sooting of the glass but these require more judgement from the operator and are more difficult to master alone. The soot is easily cleaned from the cool glass with paper towel or a rag.


So far the traditional flame annealing is the technique that produces the greatest reduction in strain as seen with the polariscope. While the samples are not entirely stress free (they show some fringing in the areas typically seen with this bend type – approaching the apex and the bent/unbent interface), it’s obvious even to a beginner like me that this is greatly reduced compared to the previous two examples.


One big upside of a polariscope that can support a little bit of weight on the viewer (unlike my previous attempt) is that it’s much easier to capture good quality photographs of specimens. These two pictures show an unannealed, 15mm to 10mm T-splice in soda glass, along with the strain radiating out from the area of the weld.
So that’s about it for our quick foray into the exciting world of optical polariscopes. As usual, feel free to get in touch if you spot any errors, or have any questions on the construction or use of the polariscopes shown here.

Nearly all bends in a traditional neon sign requires annealing
However joining glass whether it’s letter to letter or electroding then anneiling is essential
LikeLike
It seems to vary greatly by region and shop. I speak to a lot of benders in the US who say that they never anneal anything (and I’m pretty sure there’s not a lot of that with the cheap Chinese stuff that’s all over eBay), and then I speak to other shops that have very well developed quality procedures and testing.
Personally, I see it as an essential technique, along with gathering bends: it’s obviously possible to produce saleable units without, but equally, applying those techniques consistently and effectively clearly leads to a superior quality unit that’s likely to last longer in the field. It’s certainly something I am building into my own learning.
LikeLike