OK, welcome back and thank you for sticking with me past the first post! Before I jump into all the technical details, plans, sketches and so on, I wanted to post a quick overview or recap of what I’ve been doing over the last year or so since the project kicked off. Take this as a brief tour or status update: I’ll go through things roughly in order as you walk into the shop.

The Stores
An efficient and well-organised store is essential to working effectively and efficiently, as I discovered by not having one for my first few months.
Glass tubing is best stored flat and level, and without any strain along the length of the sticks: shelves, racks and cabinets are ideal. Cardboard boxes on the floor not so much.
In the end I used some commercial shelving: 300mm deep and 1800mm tall with five shelves. The bottom shelf has 5mm tubulation and 8mm glass, and the next three work up through 10mm, 12mm, and finally 15mm (actually there are a couple of 18mm sticks on the bottom, but I don’t use those much).


As well as clear soda glass I have some stocks of coloured and coated glass: there are a couple of UV torches hanging off the end of the shelves for checking colours. Everything is either in the original boxes or bags to keep the dust off as much as possible, and tubes can be removed vertically from boxes or bundles to avoid scratching them on the way out.
On top of the shelving are boxes of electrodes: I keep about half a dozen different types around: half from the US (EGL and SVP), and the rest from Sign-Tec in the UK (Neon Products).
Inside the workshop I have a few of the old fashioned drawer cabinets for keeping all the essential washers, tape, bungs, hose barbs, o-rings, compression caps, screws, gloves, hose clamps, nobestos, mica, BSP fittings, … you name it – all the little odds and sods that you need to keep the whole show running.

I’ve got the power


Electrical power is a fundamental requirement for any neon workshop. To run the bombarding equipment at full capacity calls for a 100 amp mains incomer. Luckily my home is old enough to have a 100 amp supply, but honestly, the cables and plugs are just crazy… and for the sizes of units I’m currently working with a 63 amp feed is plenty.
This feeds through to a little consumer unit underneath the pattern bench, which includes a digital multifunction meter: line voltage, load current, power factor, and real and reactive power readouts. Did I ever mention my fondness for gauges??
From the CU the feed goes up through the bench and into the fat controller. This cabinet is responsible for switching and monitoring all the primary and auxiliary loads in the room, as well as stepping the UK mains voltage down to 115V to power US 110V devices.
Lastly comes the bombarding transformer itself: a 20KVA model from Masonlite that can be operated at either 10,000 or 20,000V: the higher voltage range is needed to break down the gas when processing longer units.
On the bench
Next we come to the benches: pattern bench, flame bench, and processing table. As the names suggest, each bench has a different purpose (although in a shop the size of mine, a little flexibility is often required!).
Pattern bench
The pattern bench has the pattern that the glass is being bent to, and is where final adjustments and fit are made and checked. It’s also where most of my tools live: it’s kinda like home base.
Mine is covered in fireproof tile backer and a replaceable layer of fibreglass pattern cloth. On the left side of the bench I keep pots of various marking, measuring and glass working tools and there are boss stands at the back for holding glass during splicing and other operations.


Flame bench
The flame bench is where all the burners and torches sit, as well as having the fuel gas, air, and oxygen supplies (and a little extra storage space). I currently use six torches, although of those, I use three day-in-day-out, and the others are for more specialised tasks:
- Arnold 103PSL bench burner
- Antique 6″ laboratory ribbon burner
- Arnold 141aPSL hand torch
- Arnold 150PSLe 600mm ribbon burner
- Carlisle Universal hand torch w/no.1 nozzle
- Nortel Minor Oxy/Propane bench burner (lampworking torch)


The Arnold bench burner is mounted on a trolley for ease of use: the height is adjustable and it can be moved around to either make space for other tasks, or to get the flame in a comfortable and visible position.
All the torches are fed from a custom made BSP propane manifold with individual shutoff valves to allow easier maintenance.
Because having bottled oxygen in my basement is frankly terrifying, I use a reconditioned, ex-medical oxygen concentrator. They are reasonably cheap and a brilliant solution for running one or two torches. I got mine from Tuffnell Glass – they have a range of models with different capacities according to requirements.
Processing bench
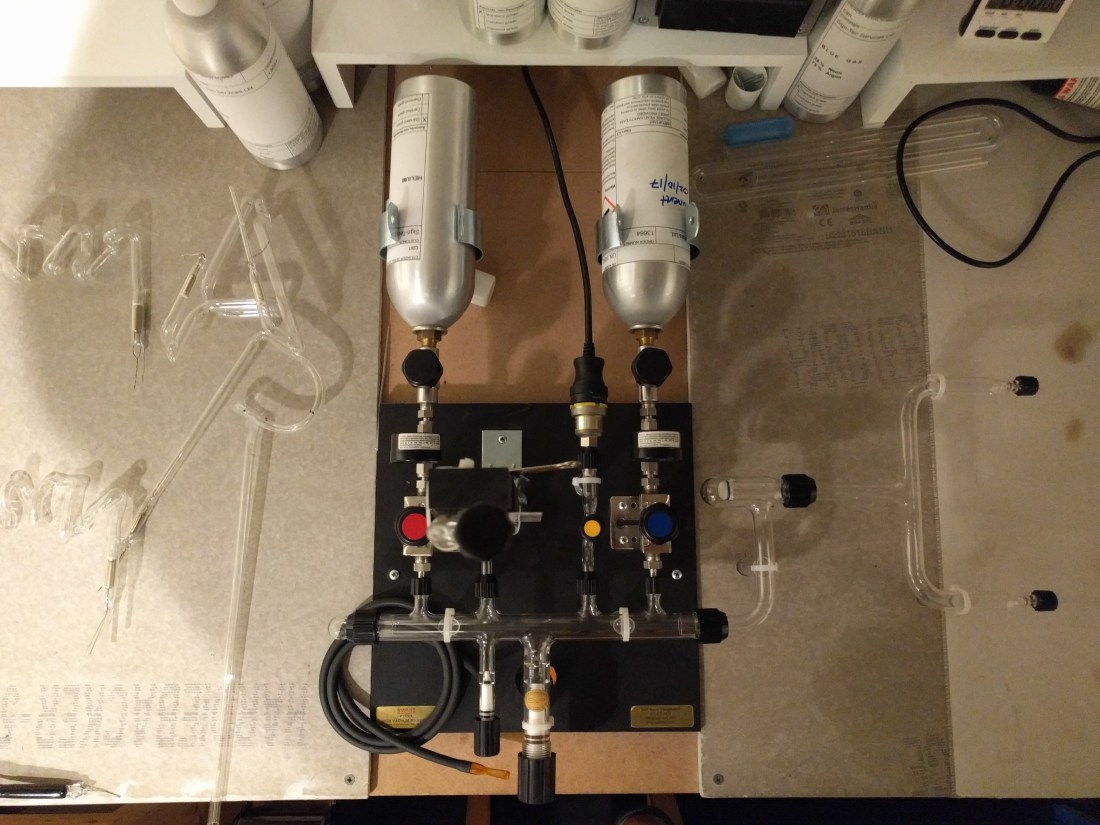
The processing table is where all the mad scientist stuff happens: the pyrex glassware, the high voltage trolley system, and, of course, the pumps.

There are three main aspects involved in all types of neon processing: heating (to release contaminants from the glass, and to convert the electrode shell coatings), evacuation (to remove the contaminants), and filling (to get the correct pressure of pure rage gas in the tube at the end).
Right now I’m only doing conventional ion (or electron) bombarding: using a high voltage source to break down the gas in the tube, and to generate a lot of heat and light in the process. This is the traditional process as developed by George Claude in the early 20th century. The alternative to bombarding is baking in an oven. This requires a lot more equipment, and is a more specialised process: it’s still fairly uncommon in the neon lighting industry.
Underneath the processing bench sit the two vacuum pumps: a mechanical “roughing” pump that is used to produce a vacuum of approximately five millionths of an atmosphere (5mTorr), and a high vacuum diffusion pump that can get it all the way down to less than 0.000001 atmospheres. How much less I have no idea: my gauge doesn’t read that far and an ultimate vacuum of less than one mTorr is considered more than adequate for neon processing.

The intake of the diffusion pump is connected to the main stopcock on the vacuum manifold. This allows the operator to accurately control the pressure inside the manifold (and the unit being processed), and to either evacuate the entire system, or fill it to a controlled pressure with one of the attached rare gasses.
The bombarding current and voltage are controlled by a series of switches on the controller cabinet, and a foot switch underneath the bench. The entire area in front of the processing bench is covered in 15KV certified switchgear matting, and I sit on a wooden stool at all times when operating the bombarder.
There are also 5KG CO2 extinguishers reachable from any part of the working space.
Safety concious? Me? What gave you that idea?

To process neon successfully, you need to know what is going on inside the tube. To do that there are four main gauges (some shops only use three: temperature can be measured using special papers and waxes):
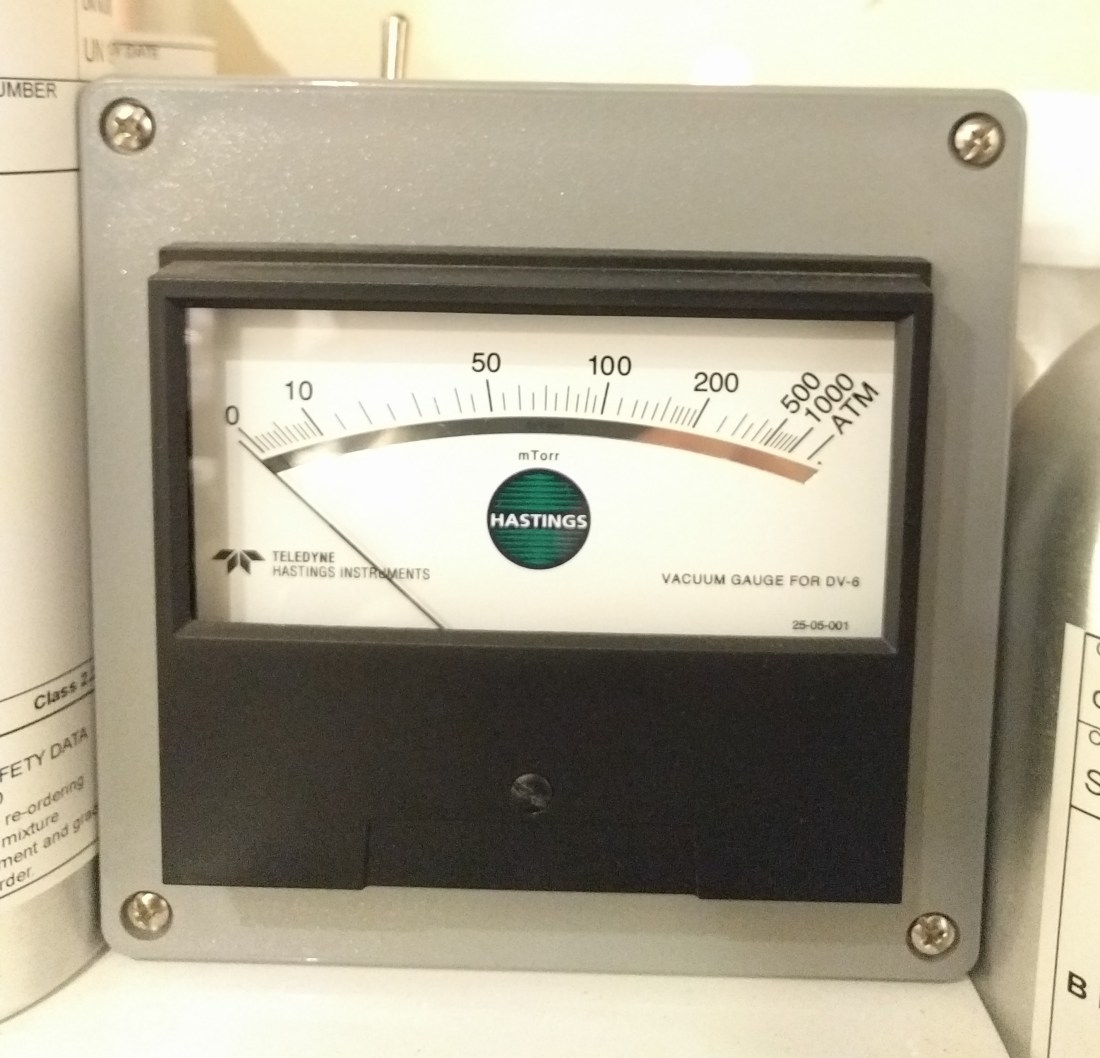
- Vacuum gauge
- Bombarding milliammeter
- Temperature gauge and thermocouple
- U-gauge manometer
The vacuum gauge uses a special gauge tube sensor to read the pressure inside the manifold. To prevent contamination from air entering the manifold or bombarding exhaust being pumped out, it is mounted in a separate tube with its own stopcock.
The bombarding milliammeter measures the current in the high voltage bombarding circuit. This is important since careful control of the current at various stages in the bombarding process is needed to properly process the tube, and to avoid damaging the delicate electrode shells and their emissive coating. I actually have two: one that came with my bombarding transformer and a larger, easier-to-read one from SVP.
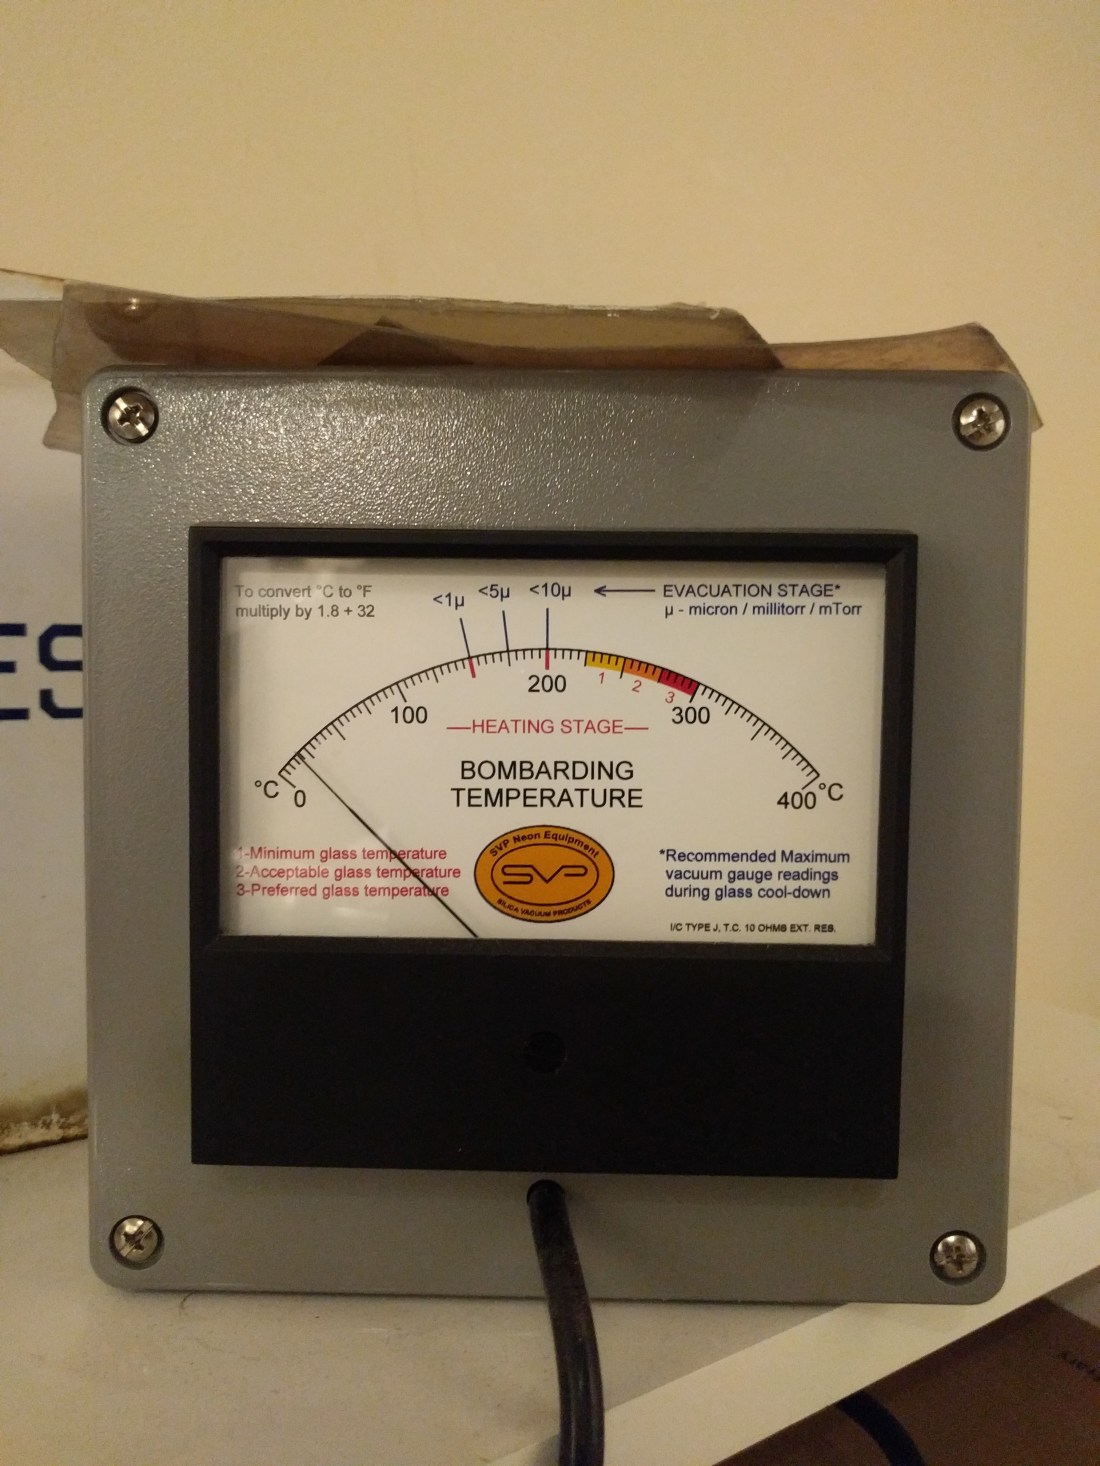
There are various ways of monitoring the temperature the glass reaches during bombarding. Traditional methods include paper that chars or changes colour at a set temperature, or wax pencils that will melt and give an indication at a certain point.
I really like the SVP bombarding temperature gauge. It is expensive compared to the traditional methods, although there are no consumables needed and recalibration is fairly infrequent but as an absolute beginner, and with no local expertise to rely on, it provides an excellent way to monitor the process, and with easy-to-read indications that show you exactly where you should be at any given moment.
As well as the scale calibrated in degrees centigrade, there are coloured bands indicating the ideal bombarding temperature, and marks showing the vacuum level that should be achieved at specific points during cooling and evacuation in order to ensure a clean, well-processed tube.
The U-gauge manometer is the large “tower” that sticks up in the middle of the manifold. It’s a simpler relative pressure gauge that is used when admitting air into the manifold for bombarding, and to measure the pressure of rare gas during filling. I’ll post some pictures of it in use in a future update.
What’s next?
That’s about it for today’s quick tour. I’m hoping to keep up making new posts a couple of times a week: I’m planning a series of posts of the electrical kit that I built myself, including parts lists and schematics for anyone trying to put something similar together, and I’d like to do a few on glass working technique. Obviously, I’m still a complete beginner, so don’t expect a neon masterclass, but I want to try to cover things like common faults in basic bends. There are plenty of articles and books that describe these things, but very few photographs, videos or good quality illustrations that are freely available and that clearly show right and wrong technique.
If you have an ideas, requests or suggestions please get in touch via the comments, contact page or Facebook.
EDIT: OK, that wasn’t actually that quick. Sorry about that.

Great start! Looking forward to more updates 🙂
LikeLike
Hi love the site, hope you are still doing this. I also make neon based in Doncaster. Gone through all the same issues, but now have end product and customers. Please feel free to catch up for a chat, or request me at Facebook.
LikeLike