Glass is a tough material that shows excellent strength and resistance to breakage, but this all depends on the integrity of the outer surface. An imperfection, scratch, or other break in the continuous surface of the glass can be made to spread and eventually cause the glass to break: the difficulty is in making this a controlled process that yields a clean, square cut without jagged edges, cracks, or chips.
Cut glass will typically need to be welded, either to an electrode or another section of tubing and this is most reliably performed when both pieces of glass have cleanly cut surfaces.
Many tools are available to cut glass in various forms. In this post we’ll concentrate on tools that are useful for cutting the types of tubing used in neon work. Diamond styli and wheels are common tools for cutting glass sheet but these have little use in the neon shop. We’ll run through the different types and their use, and the proper technique for splitting the glass.
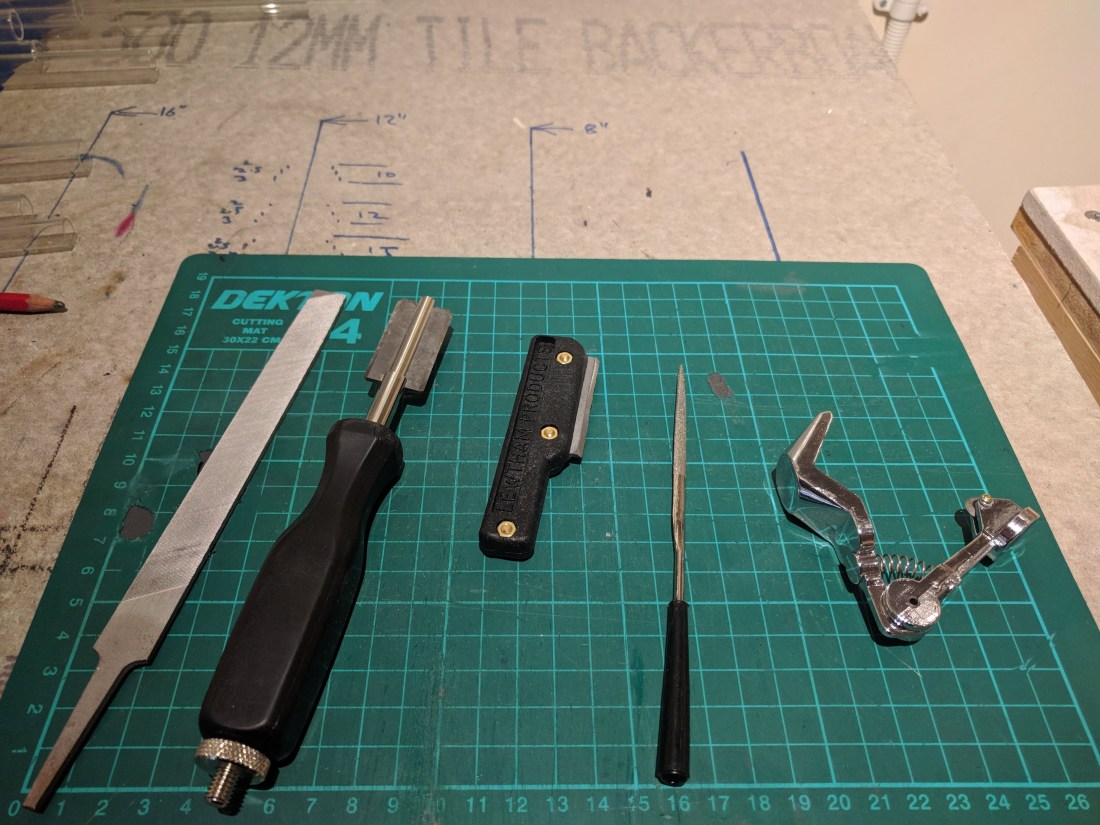
- Tools for glass cutting (left-to-right): mill bastard file, laboratory glass knife, plastic glass knife, diamond file, circle scorer
When using any of these tools it’s a good idea to use a cutting mat, both to protect the surface of the benches and to catch any glass frit, chips or powder from the cutting process.
The basic technique for cutting glass tubing is similar for most of the methods used in neon work: first a tool is used to create a scratch in the glass surface at the point of the cut, and the tube is then placed under tension and carefully snapped to separate the ends.
It’s important to practice the right approach for both scoring the glass and separating the two ends. Bad technique can easily lead to tubes shattering, or breaking in an uneven and jagged way, wrecking a unit or leading to problems down the road.
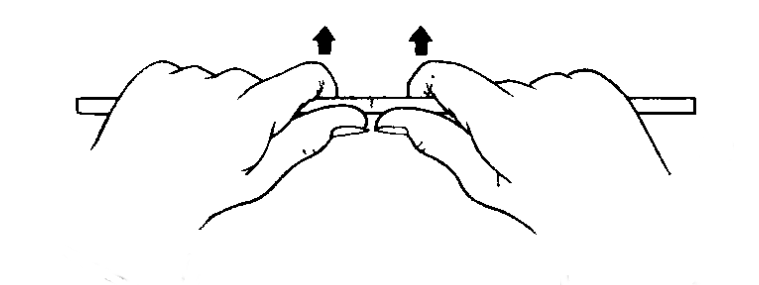
Snap chat
To snap a tube that has already been scored, the stick is held in both hands, with the scratch level with the centre of the chest and facing directly away from the body. The thumbs are placed directly behind and on either side of the scratch and the motion begins by pulling slightly out from the ends of the stick to keep it under tension, and then applying light pressure behind the scratch with the thumbs.
If everything has been done properly the tubes should separate with a sudden “snap” leaving two clean and square cut ends (be aware of your surroundings to make sure the tube ends don’t collide with anything!).
If the tube does not break easily at this point, stop: the scratch is probably not good enough and the tube is likely to break badly. Carefully re-score the tube in the same place and try again.
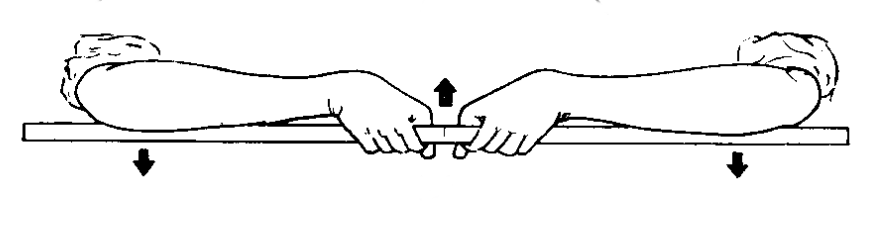
For larger diameter or thick-walled tubing a different technique is sometimes recommended: the stick is held as before, but this time with the scratch facing up toward the ceiling. The hand grip is over the tube with the fingers and thumbs curled around on either side of the scratch. The elbows make contact with (and press down against) the glass. Tension is applied first and then the forearms pivot so that the hands lift up and the elbows push down to separate the tubing.
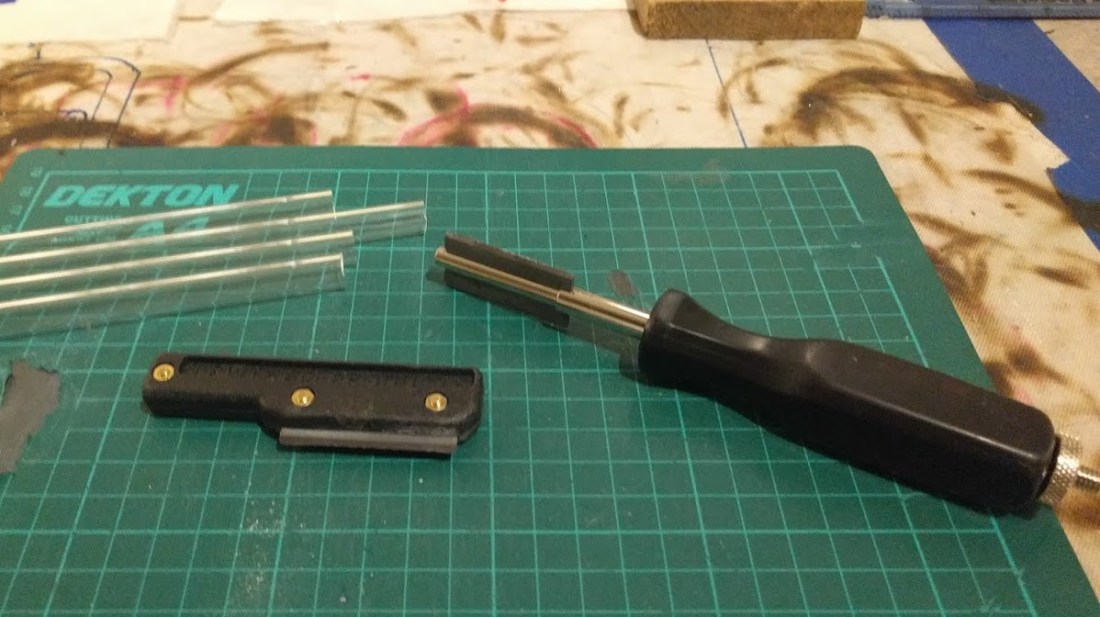
Tungsten-carbide glass knife
Knives with hardened tungsten-carbide blades for scoring glass are available in a variety of styles and sizes. These tools are common in neon workshops and laboratory glass work throughout Europe and other parts of the world, and can be used to effect quick, clean and reliable cuts in common sizes of tubing used for neon work.


To use the knife, it is held perpendicular to the length of the tube and drawn quickly and with a firm pressure across the surface of the glass in one direction (normally toward the operator). The ideal is to create a single, clean and sufficiently deep scratch that the tubing will separate into two square ends in one quick operation. Never “saw” the glass knife back-and-fore as this will rapidly dull the blade. For larger diameter tubing it may be easier to rotate the tube away from the knife while drawing the scratch.

It is possible to break a tube cleanly from a very small scratch, but it is better to aim to score about one third of the tube circumference in order to get reliable cuts.
The pressure needs to be even and sufficient to mark the surface, but not so great that it causes the scratch to wander or chip the glass surface. Grossly excess pressure when scratching the tube may cause the tube to shatter: sometimes creating a bloody mess in the process!
If the scratch is not perpendicular to the tube length, or it “wanders” or twists over the length of the mark the tube is much more likely to break unevenly and leave jagged edges. Small burrs and “teeth” can be cleaned up and removed, but larger imperfections will make subsequent splicing of the glass more difficult and prone to cracking or forming pinhole leaks.
The best way to figure this out is to take some bits of tubing and practice making scratches until it becomes second nature. Clearing out the glass bin and chopping off any usable offcuts is a great way to build skill (but be careful as already heated glass is more likely to have strain that may cause it to shatter suddenly).
For my money, I like the old fashioned, “stubby” wooden handled knives best: they fit comfortably in the hand and I find it fairly easy to get a good mark on a range of tube sizes. Unfortunately they are no longer manufactured in the UK and are now very hard to find.
Of the plastic replacements, I like the small one for small diameter tubing and tight spaces, and the long-handled laboratory knife for bigger tubing. You can use either for either job, of course, but I find the little one doesn’t make such a confident scratch on big tubes, and the big one is a bit brutal on small tubes: it’s surprisingly easy to just crush the tube instead of marking it!
Mill bastard file
The mill bastard file is a standard type of file commonly used in metalworking: these are more common in neon shops in the US and outside of Europe. Mill specifies the shape of the file: a rectangular cross-section and even thickness, and often with a slightly tapered width down the length of the file, and bastard refers to the smoothness grade: a medium rough pattern.

For glass use the file should be made of a hardened tool steel in order to not be blunted by the abrasive glass but even so will require regular sharpening using a whetstone or bench grinder.
Two techniques can be used with the glass file: in the first, the file is used in exactly the same manner as a glass knife. The sharp edge of the file is drawn perpendicular to the tube length, in one direction only, leaving a single clean scratch in the tube wall. Alternately (and this can be easier to learn initially), the file can be carefully “sawed” back and fore over the surface to create a deeper mark.
Both techniques can be used to create a clean cut, but the single scratch method may be more reliable. Sawing tends to create a large, blunt mark, and this may be more prone to breaking erratically.
Diamond file
The diamond file is a special type of file, often used by jewellers and in other fine metal craft work. A metal blade is coated in an abrasive containing small diamond grains yielding a quite aggressive surface that is very wear-resistant. Diamond files are generally used in a see-saw motion and like sawing with a metal file, produce a larger and coarser mark in the glass surface.
Diamond files can be useful for cleaning up small burrs, levelling a bad cut and reaching into tight places to mark a piece of tubing, but they should probably be thought of as an option of last resort to “rescue” an already bad situation: although all methods of cutting glass will produce small pieces of glass frit and dust, diamond files are incredibly messy and produce large amounts of very fine glass powder when used for significant cuts. This causes itching and discomfort if it contacts the skin, and is a dangerous respiratory irritant.
Glass cut with a diamond file should be thoroughly cleaned before use if any material has entered the tubing (organic solvents and de-ionised water can be used, followed by thorough air drying). Small bits can be safely blown away with an airduster or compressed air from the fires.
Water cooled diamond wheel
Like the diamond file the cutting wheel uses a diamond-edged blade to cut directly through glass: a common tool in scientific glass work (especially in preparing glass for working at the lathe), the diamond cutting wheel is seldom used in routine neon work, but may be useful for ensuring clean cuts on borosilicate, heavy walled and very large tubing (18-25mm or more) which can be difficult to cut with other techniques.
Washing with distilled water and solvents may be necessary to remove contaminants from the tube introduced during cutting since the wheel spreads glass powder and frit, as well as the cooling/lubricating fluid around the inside of the workpiece.
Tube cutter / circle scorer
Similar to pipe cutters for metal and plastic tubing, the circle scorer is a clamp or scissor-like tool that fits around the tube circumference. A small diamond wheel in the tool’s jaws then scratches against the glass surface as the tube is rotated. The cleanest breaks are obtained by making a single light 360º scratch.
These tools can be fiddly in that (especially with cheap versions) the tube can easily move longitudinally while it is rotated. This results in the scratch following a spiral path around the tube: it is almost impossible to get a clean break in this situation as the break will not be perpendicular to the length of the stick and cracks will tend to try to curve up the length. The problem can be avoided by paying close attention to the growing score as it passes through the tool: keep it up at eye level and rotate slowly, ensuring that the tube is kept in alignment so that the scratch travels down directly behind the point where the wheel is meeting the glass.
Sometimes the tube cutter is handy for ensuring a more reliable cut in combination with another technique (especially the hot wire cutter), but they are seldom used in day to day cutting since the operation takes more time, and is trickier, than using either a file or a knife to cut straight tubing.
Hot glass / hot wire tube cutting
These two methods are somewhat different and must be used together with another means to create a scratch in the glass surface. They replace the action of physically snapping the glass stick by means of thermal shock: a very hot object is brought suddenly into contact with a scratch on the glass surface, causing rapid expansion of the heated glass and subsequent cracking.
The beauty of these techniques is that they can create clean, reliable cuts in very inaccessible and awkward places (where you would otherwise risk damage to the unit or injury attempting a manual break), or when a very short section of glass (down to less than 15mm) must be removed from the end of a tube.
The tube is first scored with a knife, file, or circle scorer, and then either a small bead of very hot glass (prepared by melting the end of a piece of rod or tubulation) is pressed against the crack, or the tube is held in a loop of wire that is heated electrically to a very high temperature. Often the tube will immediately crack leaving a clean break. Other times the procedure can be repeated in order to “chase” the crack along the scratch to finish the cut, especially for very large diameter glass.
We’ll look at these techniques more in the next article.
Spit’n’split
One technique that can be a great boost when cutting glass with knives or files is to apply a little bit of moisture to the scratch before splitting – a small dab of saliva on a finger is fine. The liquid reduces the force needed to grow the crack and separate the ends of the glass and this can make a huge difference, especially when a difficult cut must be made (such as a tight electrode doubleback).
Cutting bent tubing
It’s often best to avoid making a cut in a bend if possible: tubes that have already been heated require special techniques to avoid cracking. Long, sweeping ribbon burner bends are especially prone to cracking lengthwise if not handled correctly.
If you know you are going to make a cut right after a bend it can help to make the cut with the knife or file immediately, while the glass is still hot. Alternately the glass can be re-heated, almost to the point of softening and bending, before making the scratch. If you have to make the cut while the glass is cool ensure that it is completely cooled before marking to reduce the risks of cracks.
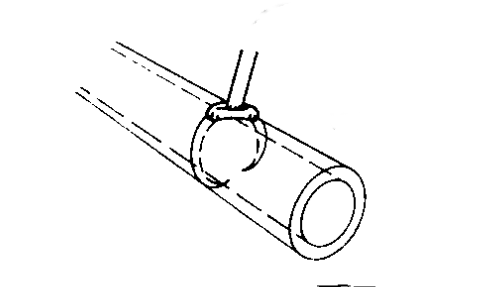
If it becomes necessary, one technique to obtain a more reliable cut is to heat a ring of glass at the point where the cut is to be made using the hand torch, and then stretch the glass slightly to create a “waist” where the outside diameter narrows slightly. Once the narrowing has been made, the cold knife or file is held or rubbed against the hot tubing: often this shock is enough to cause a clean break. Alternately the glass may be left to cool and scored and cut at the narrowing in the normal way.
That’s it for this look at tube cutting techniques for neon use. Join us in the next post when we’ll take a look at designing and building a hot wire tube cutter for use in the shop.

One thought on “Cutting Crew”