“You’ve worked hard, and you’ve saved and earned, but all of it’s going to burn”
It’s a little known fact that Arthur Brown wrote these lyrics while setting up his first neon shop: he’d just read the quotation for the necessary gas torches and was feeling the heat in his wallet.
It’s a truer fact that the burners, and the equipment needed to run them, are one of the two chief expenses in setting up a working neon shop. Getting the right kit and understanding when and how to use it is key to setting up and staying within budget.


In this post we’ll take a more detailed look at the equipment needed to work glass at temperature. For now we’ll just focus on the torches and supporting equipment: I’ll save discussion of techniques such as lighting, setting and using the torches for a later update.
A range of different burners are used in a typical workshop according to the needs of the task at hand. There are also considerable regional differences in the types of equipment used: in Europe, the burners are directly derived from the equipment used for scientific glassblowing. Single nozzled bench burners and hand torches are the norm and a range of styles of ribbon burner are available. In North America the neon industry quickly adopted more specialised types of burner which facilitate common operations in neon glass bending.
Whichever style you use the same end results can be achieved: the differences largely come down to specific manual techniques and sometimes influence the choice of tool for a particular job.
The choice of particular burners and configurations is very personal. People who learn on one or the other style will usually have a strong preference for that type of equipment and many glass benders have a preferred tool: some will work primarily with a bench burner, while others may make extensive use of hand torches.
Using equipment you are not used to can be an unsettling and confidence-knocking experience: master glassbenders can seem like complete beginners, and beginners find they cannot manage techniques they have already mastered on their own kit.
Burner types
A range of torches and burners exist to allow different operations to be performed on hot glass. We’ll run through the common varieties of both European and US torches here, although I’ll only focus on the details of the European kit: I’ve never used the American style equipment so I can’t offer any useful experience!
There are some attributes that are common to all types of burner or torch: all burners will require a supply of fuel gas, and normally a compressed air source to produce sufficient temperature and flame concentration to successfully work glass.
Some burners also either require, or allow the option of using, an oxygen feed: this allows two useful results to be achieved for glass working. Firstly, a small amount of oxygen maybe used to stabilise a gas/air flame. This allows a greater proportion of air to be added to the mix without causing the flame to gutter or blow out. Increasing the air mix produces a type of flame known as an oxidising flame. This type of flame is essential to correctly handling leaded glass: using the wrong flame will result in a sooty disclouration in the finished piece resulting from tiny particles of lead forming in the molten glass. Working with regular soda glass or leadfree formulations does not suffer from this problem although these glass types still benefit from the hotter and more stable flames these burners can provide.
Many burners that accept an oxygen connection have two valves to control the feed. The first is a stabilising valve that introduces oxygen into the nozzle of the torch, and the second is a main valve that adds oxygen to the main burner channel. The stabilising valve must always be used to achieve a gutter-free flame.
The main valve is often unused: it is needed primarily to achieve the higher temperatures needed to work hard glass such as borosilicate. When using the main valve it is advisable to wear didymium glasses to prevent glare and eye damage since the oxygen rich flame is extremely bright (as well as protection the tint of the glasses can be useful to make the glass more visible in the flame, although it also filters out the orange sodium flare which can be a useful indicator of how hot the glass is).
Burners are also classified by the manner in which the air, oxygen, and fuel gas is mixed together. Burners may be described as either surface mix or premix. A surface mix torch has a nozzle with holes for both gas and air. The two combine in the nozzle as they emerge from the holes and are ignited. In a premix burner the gasses are thoroughly mixed together before emerging from the nozzles: either in a chamber inside the burner housing, or in a separate device known as a venturi mixer.
F-F-F-F-FLASHBACK
Surface mix burners do not need any particular special handling. The main consideration for premix burners is the possibility that a combustible gas mixture could find its way back into the fuel gas pipework leading to an explosion risk.
There have been occurrences where utility gas meters have exploded due to these combustible gas mixtures.
The solution to this problem is to fit a flashback arrestor in the fuel gas delivery line. This is a device that suppresses the passage of a flame by cooling or isolating the gas mixture in the line, and provides a one-way check valve to prevent gas re-entering the fuel pipes once it has passed into the delivery lines. A single flashback arrestor is normally installed close to the fuel gas regulator and can protect a number of individual burners.
Most European burners are surface mix, with the exception of ribbon burners which are always premix. American burners come in a variety of styles with premix hand and bench burners common.

Bench burner
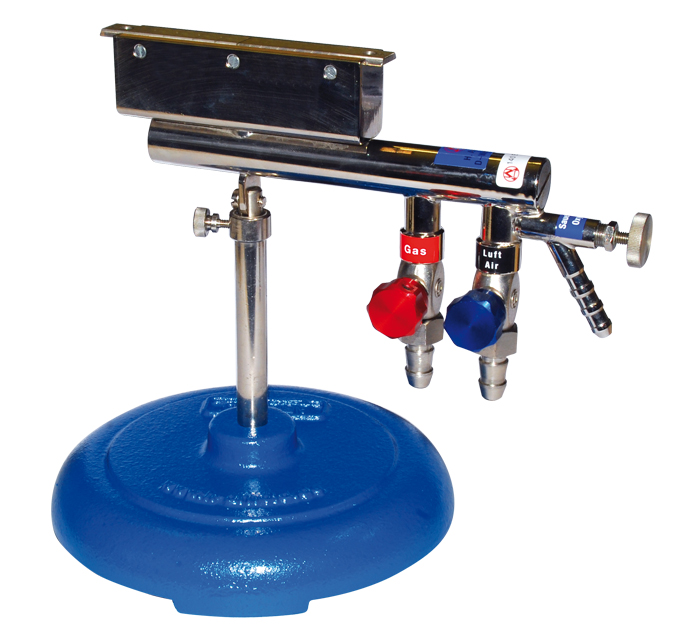
The bench burner is the heart of many neon workshops, particularly in Europe. As the name suggests the burner is built on a flat base for mounting on a bench or other surface. In practice, bench burners are often fitted to a trolley to raise the burner to a comfortable working height (some offer the ability to adjust the height), and to allow the burner to be moved around: either to create space for other work or just to bring it to a comfortable working position.
Bench burners exist in a huge range of types, offering a wide variety of flame sizes, maximum working temperatures, and control options. Common types for the neon workshop include simple gas/air surface mix types as well as more refined gas/oxygen/air models that produce a wider range of flames and temperatures.

The bench burner I use, an Arnold 103PSL, is no longer manufactured (although similar models are still available: I think the 105PSL). I picked up one the distributor still had in the warehouse at a substantial discount. If you find similar deals I think they generally make sense: parts are still available (and are often interchangeable), and the capabilities of the burners have changed little in twenty or thirty years.
I mounted my bench burner on a Tag-Z Motocross Auxiliary trolley. It was less than £100 delivered, has castors for easy movement, and an adjustable platform that the torch can be clamped or bolted to.
Expect to pay in the region of £400-£700 plus VAT for a well-made bench unit. Cheaper models are available from overseas (especially India), but watch out for poor overall build quality and expect little in the way of after sales support.
US style bench burners are often fitted on a free-standing platform, trolley or stand and typically include more than one flame source, much like US hand torches.
A crossfire is an arrangement of six or more individual burner jets arranged on two sides and having the flames pointed toward a common point in between the two rows of burners. This creates a very concentrated area of heat, and simplifies the rotation of the glass since it is being heated from two sides simultaneously. Cannon fires are a similar arrangement but normally only have two, larger, opposing burners (although a third centre burner is often provided to give additional heat from below).
I know literally nothing about these types of burner, so I’ll just leave you with a picture of EGL’s five-point crossfires.

Ribbon burner
The ribbon burner is used for all the long, sweeping curves in neon. Unlike the hand and bench burners, which normally produce a relatively confined flame and focus the heat in a particular spot, a ribbon burner creates a continuously adjustable ribbon of flame down the length of the burner body. This is used to heat a long section of glass to the working temperature and allows a skilled operator to quickly create long curves (for example, the loops of block ‘B’ and ‘R’ letters, or the long curve of the ‘O’).
All ribbon burners consist of a body with one or more rows of gas/air nozzles and a movable slide mechanism that allows the flame length to be adjusted. This means that as well as the space to mount the burner itself, sufficient room must be available to move the slider as far as is needed. For large burners this may extend over 500mm past the end of the burner itself.
A skilled worker can produce a similar effect using other burners, for example using a bench burner to heat shorter sections and making the curve piecemeal, or in some cases by manipulating the hot section through the flame to progressively form the bend. These techniques are much more demanding of the bender and are uncommon in Europe and North America.
Ribbon burners for neon use sometimes include supplemental oxygen ports and valves but these are seldom used for regular work with soft glass, although harder glasses such as borosilicate may need the oxygen boost to be able to reach working temperature.
The two main criteria to consider when selecting a ribbon burner are the minimum and maximum flame lengths as these will determine the sizes of bend that the burner can handle.
Trying to heat a short length of tubing in a burner that has a longer minimum flame length is a recipe for trouble: uneven heating, awkward movements, and singed fingers are the likely result.
Burners are commonly available in the 150mm – 1500mm range, although in neon use sizes ranging from 300mm to 600mm are most common in both Europe and the US.
I have one 150mm (6″) burner, and one 600mm (2′). This is a great combination for working a wide range of tubes and bend types since the two ranges overlap. The minimum length on the big burner is 100mm (4″), which lands nicely in the middle of the smaller burners 25mm-150mm range (1″-6″).
The larger 600mm burner is a newly made Arnold model with gas, air and oxygen inlets and needle valves for control. It’s slick and easy to use and a reliable and solid piece of equipment. The oxygen line is currently not connected as it is not needed for the type of work I am doing at the moment.
A new 600mm burner from Arnold will cost about £750 (plus VAT). It’s a significant investment but necessary to be able to easily make large curves.

The smaller 150mm burner is an antique model I found on eBay in the United States. It was built by the Eisler Engineering Co., some time around the great flood.
It needed a bit of work to make it safely usable: a replacement gas valve (swapping a lever ball valve for a more precise PANAM needle valve), and cleaning or replacing all the seals.
Like the Arnold it has connections for gas, air, and oxygen. The oxygen line is currently not connected since it is simply too terrifying.
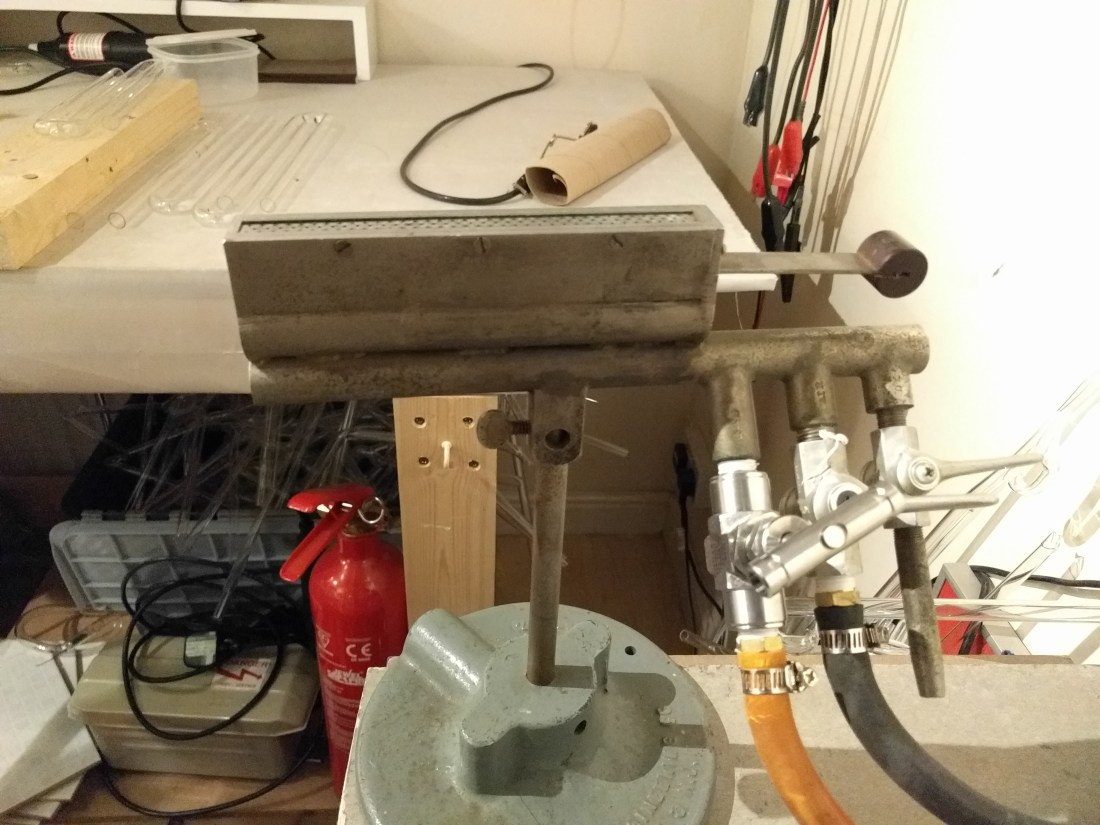
Although it’s twitchier than the Arnold and more fiddly to set due to its age and the fact it was rebuilt by me, it’s worth its weight in gold (and it’s heavy! You could kill someone with it!).
I find it perfect for doing combination bends, like the drop on the cross stroke of a block letter ‘A’, since it allows you to heat a bit longer section of glass than is easy in the bench burner with my current skills.
Arnold produce very similar modern machines: I’d like to upgrade one day, but even looking at them in the catalogue is enough to send my credit rating plummeting.
Hand torches
Hand torches are most commonly used for operations like splicing, tipping-off (separating a unit from the manifold tubulation after bombarding), and “drawing off” larger tubing to create a closure.
Some neon workers, especially artists, use hand torches extensively for bending and shaping the glass: a lot comes down to personal style but the appeal of the hand torch arises from its extreme flexibility. and ability to reach into tight spaces and direct heat to a very controlled area.
In the US hand torches conventionally have a pair of nozzles, mounted in a “wishbone” at 180º to one another so that the two flames are facing the glass and each other. This reduces the hand movement needed to apply heat around the 360º surface of the glass and since these torches are normally fed from a separate venturi mixer, the torch hose is smaller, lighter and more flexible.
On the downside, it is impossible to direct heat to a single spot (for example, to blow out a bubble to make a T-splice), and the dual heads can make the torch more difficult to manoeuvre in a tight space. US style hand torches come in several sizes: smaller versions are referred to as “tipping” torches, and larger models are used for splicing.

I use an Arnold 141aPLS propane/air/oxygen torch and also a Carlisle Universal hand torch with an optional bench stand. The Carlisle only has two gas channels but can be used as either a gas/air torch, or a gas/oxygen torch by replacing the interchangeable tip. I currently use it with the No.1 nozzle for gas and air.
The Arnold hand torch comes at a price of about £450 (ex VAT), making it one of the more expensive models.


At first I didn’t get along with the Arnold: the four valve adjustments can make setting the flame correctly a challenge for the beginner, and a basic understanding of the torch’s operation and capability is a definite benefit for getting the best out of it.


At this time I preferred the simplicity of the Carlisle: it has only two valves, which are both in easy reach while the torch is in use, and the standard nozzle produces a range of flame types suitable for neon glass working.
The main limitations of the Carlisle are the limited range of flame types (due to being either gas/air or oxygen/air only), and the fact that the nozzle is mounted in a swan neck at a fixed 45º angle: for neon use, a 90º neck is preferable since it makes the rotating hand movements used to heat the glass easier and less prone to wandering off track.
A 90º neck is available as an option (part no. 22B010-0002) from Carlisle Machine Works [PDF] and I plan to get one of these for my torches soon: with this modification the Carlisle should make a good replacement for some of the British gas/air hand torches that are no longer manufactured.
The Carlisle is available as a bare torch (no nozzle or other accessories) for a little over £100, or in a kit form with two tips and a bench stand for about £200. Stockists in the UK include Sign-Tec and GPE Scientific (who are also a good source of replacement compression caps for vacuum manifolds).
The bench stand is really useful for things like practising blowing mercury traps in tubulation, or creating sealed-off tubes for stopping bungs and manifold ports. The big bench burner can be a bit aggressive for these uses and the upright stance of the Carlisle leads to a comfortable working angle when sitting at a bench (which also allows you to brace your arms better for stability).
After getting by with the Carlisle for a few months, I paid a visit to Neon Workshops in Wakefield back in July. Richard walked me through the use of the gas/air/oxygen hand torch and took me through a few common operations: splicing tubes and the so called “German” or European style for electrode attachments.
Since then I’ve become a convert and mostly use the Arnold for my day to day splicing, tipping, and drawing off uses. Although the controls take a bit more effort to master the time is well spent: in the right hands the torch is extremely versatile and quick and easy to control. It’s worth spending a bit of time just miming hand motions, and going through simultaneous adjustments to the valves, to get used to the feel before introducing any burning gasses into the mix.
Oxygen thief
Clearly a source of concentrated oxygen is needed to run the oxygen burners. The conventional solution is to use bottled gas. This is a problem for the small or home neon workshop for a few reasons:
- Bottled oxygen is at a very high pressure and high purity
- Pure oxygen under pressure reacts violently with ordinary materials at room temperature
- Greases, oils and other common lubricants are a particular concern
- Oxygen is invisible and has no smell. During a leak it may reach dangerous concentrations without producing any noticable indication.
- Since cylinders may contain many hundreds of times their own volume of gas at atmospheric pressure they can easily raise the oxygen concentration in a room far beyond normal levels.
- A rise of just 4% from ambient (24% O2 by volume) raises the ignition risk and makes fires significantly more difficult to extinguish.
- 100% Oxygen causes fires to burn five times more intensely than in air: it may be impossible to put out such a fire with a normal fire extinguisher.
All of this makes the stuff frankly terrifying to work with. It’s really not something you want in your home under any circumstances and requires well established safe working practices and strict adherence to procedure to use safely.
Happily there is an alternative for anyone needing to run a small number of oxygen burners in the form of the oxygen concentrator.
An oxygen concentrator or oxycon is an electrical appliance that uses differences in the way that materials absorb the various gasses in air to partially separate atmospheric air and provide a continuous stream of oxygen enriched air.
They just need an electrical supply (and ventilation) to work and can be installed either inside or outside the workshop as convenient.
Although the oxygen produced by these machines is less pure than bottled oxygen they are far, far safer, and are completely adequate for neon, borosilicate, and lamp work.
One reason that the oxycon is safer is that in a confined space they can never raise the oxygen level beyond the normal atmospheric level: although the outlet is constantly pumping out oxygen rich air, the exhaust is simultaneously discharging all of the waste gas back into the room.
NOTE: this safety advantage may not be fully realised if the oxycon intake and exhaust are in separate rooms, i.e. the concentrator is installed outside the workshop. In this case a leak in the oxygen delivery line could potentially raise oxygen concentration to dangerous levels since it is not able to mix with the waste exhaust from the machine, and the machine has a constant source of ambient air to concentrate.
Although it’s not a good idea from a wear and tear standpoint (and an electrical fire could still break out), an oxycon that is left running will not create a dangerous environment due to the oxygen alone.


Oxygen concentrators are most commonly manufactured as large industrial units, or as small portable appliances for medical applications. The medical models make an ideal choice for neon use since they are small, portable, and available as reconditioned units at fairly modest prices.
I bought mine from Tuffnell Glass. It’s a 5L/min model which is more than adequate to run a single burner and they are available either alone or as part of a kit including tools and a burner for bead making. A reconditioned 5L model is available in November 2017 for just £235, or a similar 10L model can be bought for about £600.
A brand new 10L concentrator will set you back around £1600 so it’s well worth considering the second hand options.
The hose splitters and options provided by Tuffnells seem a bit pricey: I made my own up using readily available ‘T’ and ‘Y’ splitters.
If you’re interested in trying hard glass bead making (lampwork), you can buy a complete kit of tools and materials, including the burner, 5L oxycon, and propane connections for around £600.
Join us in a future post when we will look at the practical side of setting up the different burners, and adjusting the gas mixture to produce specific types of flames.
